Xin chào mọi người,
Sau bài hướng dẫn “Debug Laravel với PHPStorm và Xdebug,” chúng tôi đã thảo luận về việc gỡ lỗi trong các ứng dụng web được xây dựng bằng Laravel. Tuy nhiên, không phải tất cả ứng dụng Laravel đều là các trang web; có những ứng dụng chạy ẩn sau giao diện, chẳng hạn như các tác vụ hàng đợi (batch). Laravel cung cấp một công cụ quản lý dòng lệnh mạnh mẽ được gọi là Artisan Command, và đây là một phần quan trọng giúp Laravel trở thành một PHP Framework xuất sắc.
Hôm nay, chúng tôi sẽ xây dựng một ứng dụng nhỏ sử dụng Artisan Command và hướng dẫn cách gỡ lỗi ứng dụng đó trong PHPStorm.
Trước khi bắt đầu, các bạn cần chuẩn bị những điều sau:
1. Kiến thức cơ bản về Laravel phiên bản 7.x.
2. Môi trường làm việc PHPStorm IDE.
3. Đã cài đặt Xdebug.
Hãy tiếp tục với hướng dẫn của chúng tôi để làm quen với việc debug ứng dụng Laravel chạy dưới dạng Artisan Command trong PHPStorm.
Chú ý: Phiên bản PHPStorm của mình là bản PHPStorm 2021.1 (có bản quyền nha), trên các phiên bản khác 1 số config, tùy chọn có thể khác nhau đôi chút.
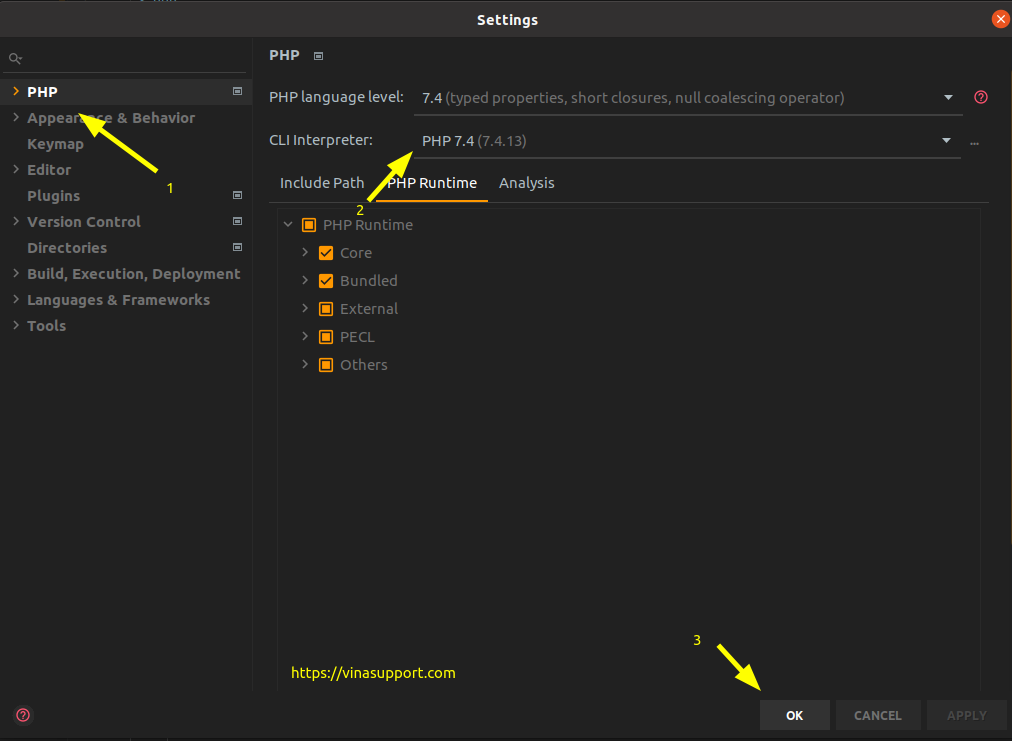
Bước 1: Thiết lập PHP CLI Interpreter
Mở PHPStorm => Chọn [ File ] => [ Settings ] để vào hộp thoại “Settings” hoặc bấm tổ hợp phím “Ctrl + Alt + S”
Sau đó chọn mục cài đặt là [ PHP ] => Mục “CLI Interpreter” là phiên bản CLI bạn muốn debug => Bấm phím [ OK ]
Bước 2: Tạo một Laravel Artisan Command
Sử dụng command sau để tạo 1 command / batch đơn giản
php artisan make:command Hello
Nó sẽ tạo 1 file Hello.php trong app/Console/Commands/Hello.php
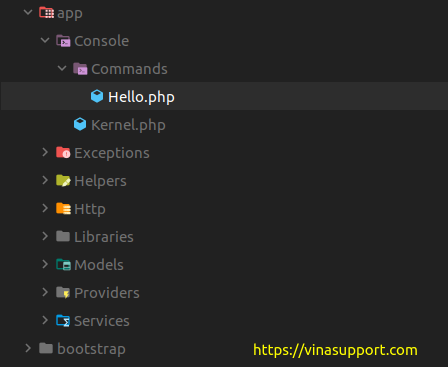
Và có nội dung mặc định như sau:
<?php

namespace AppConsoleCommands;

use IlluminateConsoleCommand;

class Hello extends Command
{
    /**
     * The name and signature of the console command.
     *
     * @var string
     */
    protected $signature = 'command:name';

    /**
     * The console command description.
     *
     * @var string
     */
    protected $description = 'Command description';

    /**
     * Create a new command instance.
     *
     * @return void
     */
    public function __construct()
    {
        parent::__construct();
    }

    /**
     * Execute the console command.
     *
     * @return int
     */
    public function handle()
    {
        return 0;
    }
}
Mình chỉnh sửa 1 chút code để thực hiện debug
<?php

namespace AppConsoleCommands;

use IlluminateConsoleCommand;

class Hello extends Command
{
    /**
     * The name and signature of the console command.
     *
     * @var string
     */
    protected $signature = 'hello';

    /**
     * The console command description.
     *
     * @var string
     */
    protected $description = 'A program by vinasupport.com';

    /**
     * Create a new command instance.
     *
     * @return void
     */
    public function __construct()
    {
        parent::__construct();
    }

    /**
     * Execute the console command.
     *
     * @return int
     */
    public function handle()
    {
        $text = 'Hello world from vinasupport.com';
        echo $text;
    }
}
Để chạy đoạn code này trên command line rất đơn giản:
php artisan hello
Bước 3: Tạo cấu hình config để debug Laravel Artisan Command
Trên PHPStorm, bạn vào mục [ Run ] => [ Edit Configurations ] để mở hộp thoại “Run/Debug Configurations”
Bấm vào dấu [ + ] => Chọn [PHP Script]
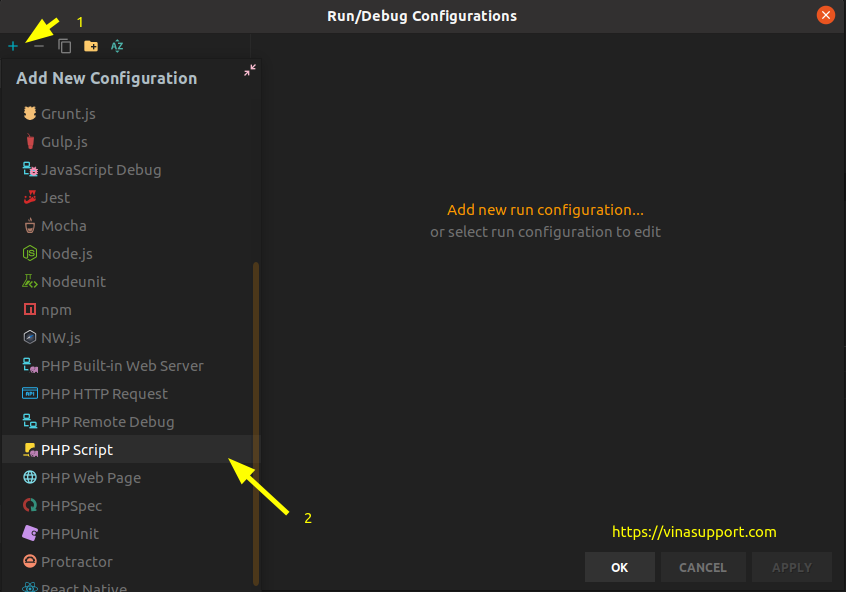
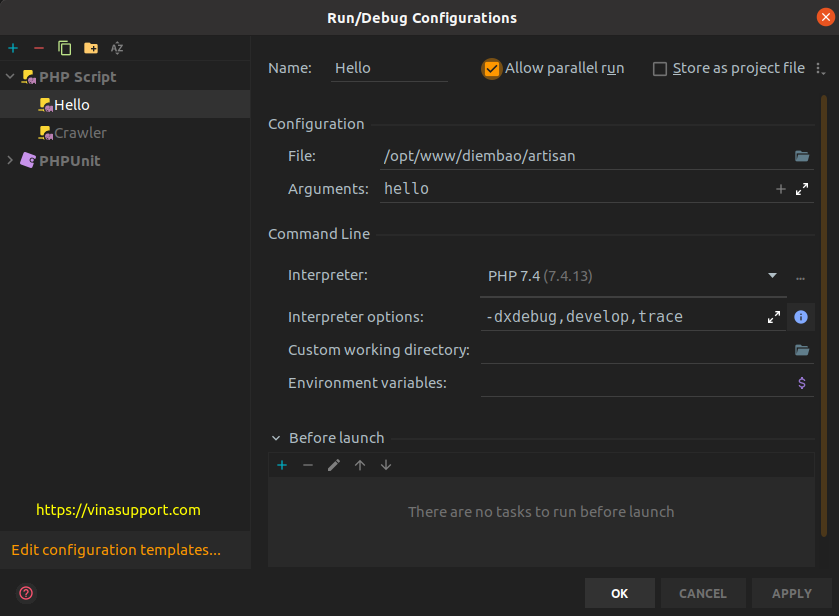
Sau đó các bạn điền các thông tin bên dưới:
- Name: Tên của cấu hình debug. VD: Hello
- File: Browse tới file artisan trong Laravel Project
- Arguments: Tên command bạn vừa tạo ở bên trên. VD: hello
- Interpreter: Chọn PHP CLI mà bạn sử dụng để debug.
- Interpreter Options: Các bạn điền “-dxdebug,develop,trace” với phiên bản của xdebug 3.x.
Trường hợp sử dụng bản xdebug 2.x thì các bạn điền “dxdebug.remote_enable=1 -dxdebug.remote_autostart=on -dxdebug.remote_mode=req -dxdebug.remote_port=9000 -dxdebug.remote_host=127.0.0.1”
Sau đó bấm [ OK ] để lưu lại config.
Bước 4: Set breakpoint và thực hiện debug
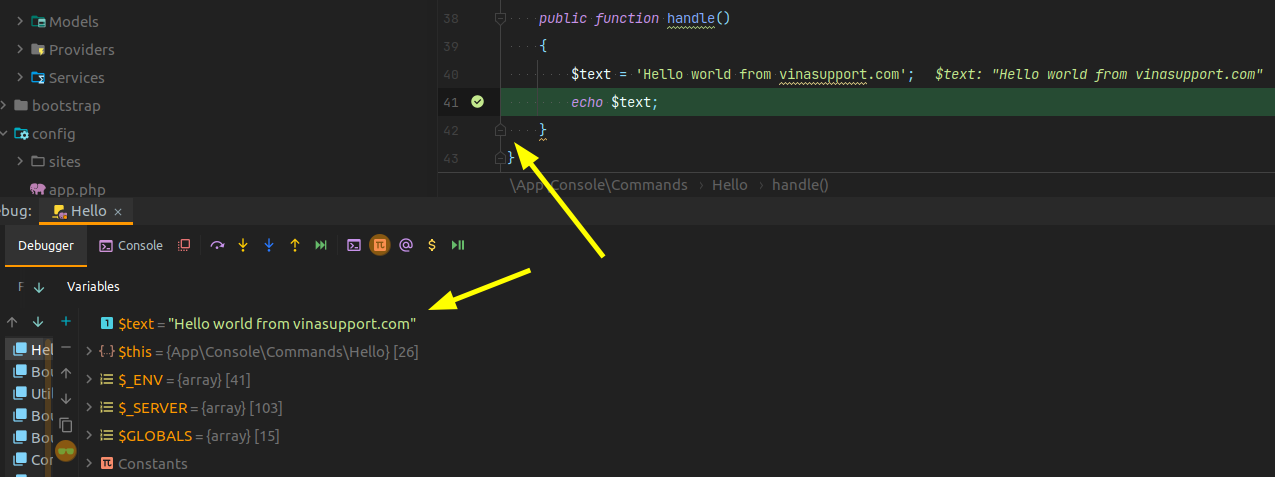
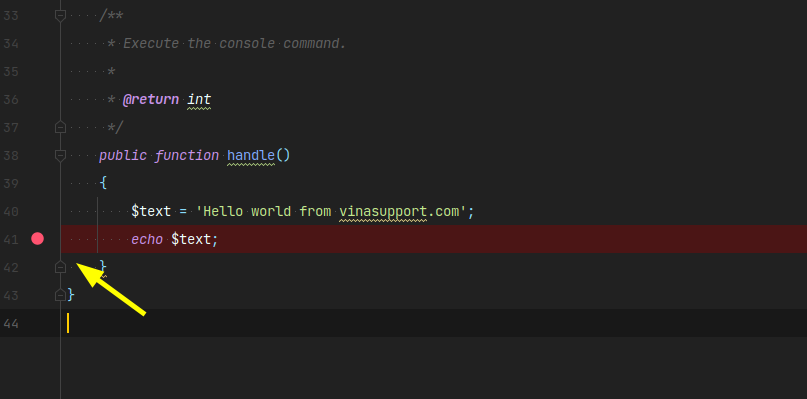
Vào lại file code “Hello.php” thực hiện set breakpoint tại bất kỳ vị trí nào bạn muốn debug
Chạy debug trên IDE
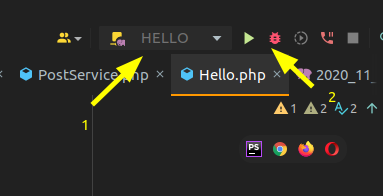
Kết quả code sẽ chạy đến đoạn breakpoint mà chúng ta đã set ở trên.
