Trong bài viết trước, chúng ta đã tìm hiểu cách tạo một module mới cho Odoo, một phần mềm thương mại ERP và CRM. Trong bài viết này, chúng ta sẽ đi sâu hơn và hướng dẫn cách tạo một Odoo Module bằng cách kế thừa từ một Module đã tồn tại sẵn.
Xây dựng Odoo Module: My_Contacts
1. Cài đặt module Contacts mà ta sẽ kế thừa
Trong bài viết trước, chúng tôi đã đề cập đến việc kế thừa một module gọi là “Contacts.” Để thực hiện việc này, bạn cần truy cập phần “Cài đặt ứng dụng” trong Odoo và tiến hành cài đặt module “Contacts” bằng cách tìm kiếm và lựa chọn nó.

2. Tạo Module My_Contacts thừa kế Module Contacts
Tạo module MyContact, sử dụng command sau:
./odoo-bin scaffold my_contact ./myaddons/
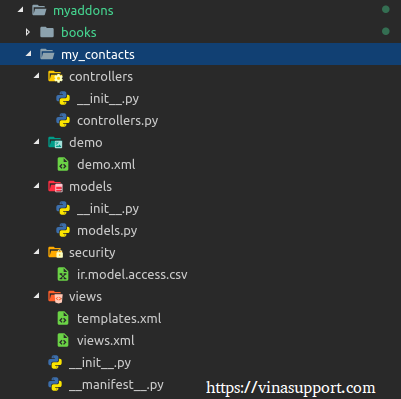
Kết quả của câu lệnh trên, odoo sẽ generate ra 1 module có cấu trúc thư mục như sau:

Chỉnh sửa thông tin của của file __mainifest__.py như sau:
# -*- coding: utf-8 -*-
{
    'name': "My Contacts",

    'summary': """My Contacts Developer by Vinasupport.com""",

    'description': """My Contacts Developer by Vinasupport.com""",

    'author': "vinasupport.com",
    'website': "http://vinasupport.com",

    # Categories can be used to filter modules in modules listing
    # Check https://github.com/odoo/odoo/blob/12.0/odoo/addons/base/data/ir_module_category_data.xml
    # for the full list
    'category': 'Uncategorized',
    'version': '0.1',

    # any module necessary for this one to work correctly
    'depends': ['base', 'contacts'],

    # always loaded
    'data': [
        # 'security/ir.model.access.csv',
        'views/my_contact_views.xml',
    ],
    # only loaded in demonstration mode
    'demo': [
        'demo/demo.xml',
    ],
}
3. Lấy thông tin form cần extend thêm field
Kích hoạt debug của Odoo: [ Settings ] => Bấm vào “Activate the developer mode”
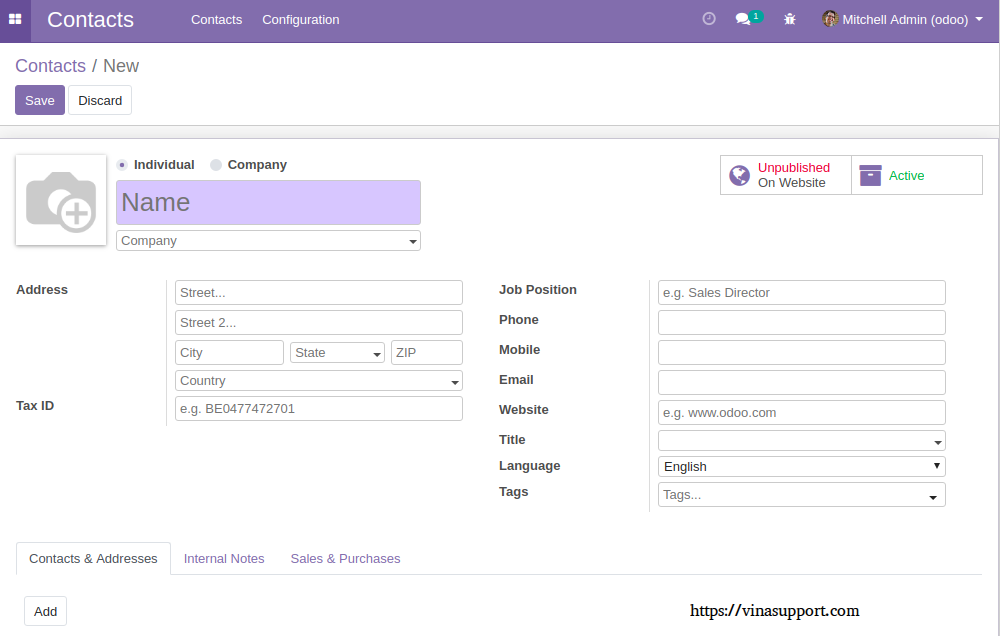
Truy cập tới màn hình cần mà bạn muốn thêm 1 field:
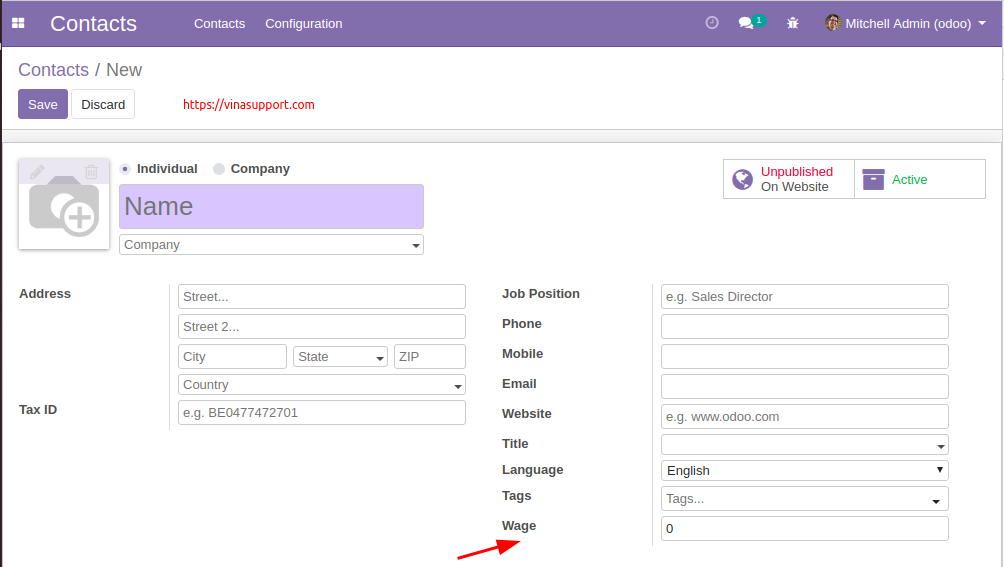
VD: Mình muốn thêm 1 field là “Wage” (Tiền lương) vào dưới mục Tags

Ở icon debug góc phải màn hình: Chọn “Edit View: Form”

Chúng ta cần quan tâm đến 1 số thông tin quan trọng sau:
- Model cần kế thừa là: res.partner
- View cần kế thừa là: base.view_partner_form
4. Tạo model MyContact
Tạo 1 file có tên là my_contact.py chứa model MyContact ở thư mục models/ của module:
File: models/my_contact.py có nội dung như sau:
# -*- coding: utf-8 -*-

from odoo import models, fields, api

class MyContact(models.Model):
    # Ingerit from Res Partner
    _inherit = 'res.partner'

    # Add wage field
    wage = fields.Integer(string='Wage')
Để load model này vào chúng ta sửa file: models/__init__.py
# -*- coding: utf-8 -*-

from . import models
from . import my_contact
5. Tạo view để thêm thông tin field
Tạo file: views/my_contact_views.xml có nội dung như sau:
<odoo>
  <data>
    <!-- explicit list view definition -->
    <record model="ir.ui.view" id="my_contacts.form_view">
      <field name="name">my_contacts Form View</field>
      <field name="model">res.partner</field>
      <field name="inherit_id" ref="base.view_partner_form"></field>
      <field name="arch" type="xml">
        <field name="category_id" position="after">
            <field name="wage"></field>
        </field>
      </field>
    </record>
  </data>
</odoo>
6. Cài đặt Module My_Contacts

Kết quả:


